'분류 전체보기' 카테고리의 글 목록 (12 Page) :: 잡다한 프로그래밍
반응형

1. 스프링 시큐리티란?

  • authentication(인증) 과 authorization(권한 부여)를 제어하는 프레임워크
  • De-facto (정해진 표준은 아니지만 사실상 표준)
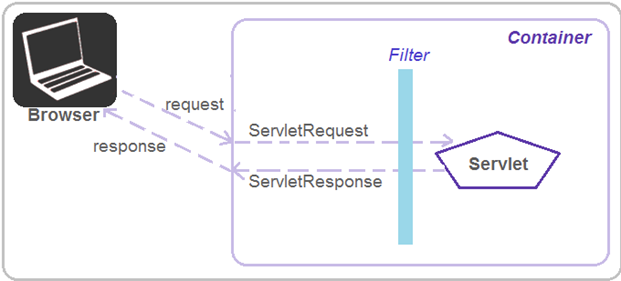
  • servlet filter를 기반으로함(리퀘스트를 가로채서 선처리하고 리스폰스를 가로채서 후처리함) ex)filter로 UTF-8 인코딩 가능
  • 필터로 등록된 DelegatingFilterProxy가 어떤 URL을 가로챌것인지 정한다


2. 스프링 시큐리티 실습하기 (커스텀 로그인)


1) pom.xml에 spring-security dependency 추가하기

<dependency>
            <groupId>org.springframework.security</groupId>
            <artifactId>spring-security-core</artifactId>
            <version>5.2.1.RELEASE</version>
</dependency> 
<dependency>
            <groupId>org.springframework.security</groupId>
            <artifactId>spring-security-web</artifactId>
            <version>5.2.1.RELEASE</version
</dependency> 
<dependency>
            <groupId>org.springframework.security</groupId>
            <artifactId>spring-security-config</artifactId>
            <version>5.2.1.RELEASE</version>
</dependency>


2) web.xml에 filter추가

	<filter>
		<filter-name>springSecurityFilterChain</filter-name>
		<filter-class>org.springframework.web.filter.DelegatingFilterProxy</filter-class>
	</filter>
	<filter-mapping>
		<filter-name>springSecurityFilterChain</filter-name>
		<url-pattern>/*</url-pattern>
	</filter-mapping>


3) security-context.xml 작성

/WEB-INF/spring/appServlet 경로에 security-context.xml을 작성한다. 먼저 name은 text, password는 test1234로 ROLE_USER를 만들고 /secured의 경로로 접근할경우 ROLE_USER인 사람만 접근할 수 있게 설정한다

<?xml version="1.0" encoding="UTF-8"?>
<beans xmlns="http://www.springframework.org/schema/beans"
	xmlns:xsi="http://www.w3.org/2001/XMLSchema-instance"
	xmlns:security="http://www.springframework.org/schema/security"
	xsi:schemaLocation="http://www.springframework.org/schema/security http://www.springframework.org/schema/security/spring-security-4.2.xsd
		http://www.springframework.org/schema/beans http://www.springframework.org/schema/beans/spring-beans.xsd">

	<security:authentication-manager>
		<security:authentication-provider>
			<security:user-service>
            	<security:user name="test" authorities="ROLE_USER" password="test1234"/>
            </security:user-service>
        </security:authentication-provider>
	</security:authentication-manager>


	<security:http use-expressions="true" auto-config="true">
		<security:intercept-url pattern="/secured/**"
			access="hasRole('ROLE_USER')" />
            
		<security:form-login login-page="/login" />
		<security:logout logout-url="/logout" />
	</security:http>
</beans>


4) web.xml 수정

다음과 같이 context-param내부에 security-context.xml경로를 추가한다

	<context-param>
		<param-name>contextConfigLocation</param-name>
		<param-value>
			/WEB-INF/spring/root-context.xml
			/WEB-INF/spring/appServlet/security-context.xml
		</param-value>
	</context-param>

5) LoginController 작성

@Controller
public class LoginController {

  @RequestMapping(value=“/login”, method = RequestMethod.GET))
  public String login() {

  	return "login";
}


5) login.jsp 작성

다음과 같은 login.jsp를 작성한다 csrf 토큰값을 함께 사용하여 csfr공격에 대비한다

<form action="<c:url value="/login" />" method='POST'>

  <table>
    <tr><td>User:</td><td><input type='text' name='username' value=''></td>   </tr>
    <tr><td>Password:</td><td><input type='password' name='password' /></td>  </tr>
    <tr><td colspan='2'><input name="submit" type="submit“ value="Login" /></td> </tr>

    <input type="hidden"  name="${_csrf.parameterName}"value="${_csrf.token}"/>
  </table>

</form>


6) 결과

secured로 요청을 보내면 custom login form으로 요청이 전송되고 이를 지정된 ROLE_USER가 맞는지 판단함


7) 추가정보

로그인 실패 : /login?error로 요청이 전달됨

로그아웃 성공 : /login?logout으로 요청이 전달됨

따라서 다음과 같이 처리가능

@RequestMapping(value="/login", method = RequestMethod.GET)
public String login(
    @RequestParam(value = "error", required = false) String error, 
    @RequestParam(value="logout", required=false) String logout, 
    Model model) {

    if (error != null) {
        model.addAttribute("errorMsg", "Invalid username and password");
    }

    if(logout != null) {
         model.addAttribute("logoutMsg", "You have been logged out successfully ");
     }

     return "login";

}


세션의 시간 설정 및 중복로그인 방지 방법 invalid-session-url = 세션 시간초과

max-sessions = 최대 로그인하는 수, expired-url 중복로그인시 보낼 url

	<security:session-management invalid-session-url="/login?timeout=1">
			<security:concurrency-control max-sessions="1" expired-url="/login" />
		</security:session-management>
반응형
반응형

0. 사전준비

도커 설치 및 War파일이 준비가 되어있다는 가정하에 시작한다.


1. Dockerfile작성

Dockerfile

다음과 같은 도커파일을 작성한다. 이때 server.xml과 war파일은 도커파일이 존재하는 디렉토리 내부에 존재해야한다.


FROM tomcat:8.5-alpine #톰캣8.5 사용

ENV TZ=Asia/Seoul
Run rm /usr/local/tomcat/conf/server.xml #기본으로 있는 server.xml을 지움
COPY server.xml /usr/local/tomcat/conf/ #현재 디렉토리에 있는 server.xml을 복사
RUN ln -snf /usr/share/zoneinfo/$TZ /etc/localtime && echo $TZ > /etc/timezone #시간을 서울로 설정
RUN value=`cat conf/server.xml` && echo "${value//8080/1111}" >| conf/server.xml #기본포트가 8080인데 1111로 변경 필요한사람은 쓰고 8080쓸거면 지워도됌
RUN rm -Rf /usr/local/tomcat/webapps/ROOT #기본으로 있는 ROOT를 지움
COPY keti_main.war /usr/local/tomcat/webapps #현재 Dockerfile이 작성되는 디렉토리에 있는 war파일을 컨테이너 내부로 복사
ENV JAVA_OPTS="-Dserver.type=dev" #자바 옵션 설정


Server.xml

<?xml version="1.0" encoding="UTF-8"?>

<!--Licensed to the Apache Software Foundation (ASF) under one or morecontributor license agreements. See the NOTICE file distributed withthis work for additional information regarding copyright ownership.The ASF licenses this file to You under the Apache License, Version 2.0(the "License"); you may not use this file except in compliance withthe License. You may obtain a copy of the License athttp://www.apache.org/licenses/LICENSE-2.0Unless required by applicable law or agreed to in writing, softwaredistributed under the License is distributed on an "AS IS" BASIS,WITHOUT WARRANTIES OR CONDITIONS OF ANY KIND, either express or implied.See the License for the specific language governing permissions andlimitations under the License. -->

<!-- Note: A "Server" is not itself a "Container", so you may notdefine subcomponents such as "Valves" at this level.Documentation at /docs/config/server.html -->

-<Server shutdown="SHUTDOWN" port="8005">

<Listener className="org.apache.catalina.startup.VersionLoggerListener"/>

<!-- Security listener. Documentation at /docs/config/listeners.html<Listener className="org.apache.catalina.security.SecurityListener" /> -->


<!--APR library loader. Documentation at /docs/apr.html -->


<Listener className="org.apache.catalina.core.AprLifecycleListener" SSLEngine="on"/>

<!-- Prevent memory leaks due to use of particular java/javax APIs-->


<Listener className="org.apache.catalina.core.JreMemoryLeakPreventionListener"/>

<Listener className="org.apache.catalina.mbeans.GlobalResourcesLifecycleListener"/>

<Listener className="org.apache.catalina.core.ThreadLocalLeakPreventionListener"/>

<!-- Global JNDI resourcesDocumentation at /docs/jndi-resources-howto.html -->


-<GlobalNamingResources>

<!-- Editable user database that can also be used byUserDatabaseRealm to authenticate users -->


<Resource pathname="conf/tomcat-users.xml" factory="org.apache.catalina.users.MemoryUserDatabaseFactory" description="User database that can be updated and saved" type="org.apache.catalina.UserDatabase" auth="Container" name="UserDatabase"/>

</GlobalNamingResources>

<!-- A "Service" is a collection of one or more "Connectors" that sharea single "Container" Note: A "Service" is not itself a "Container",so you may not define subcomponents such as "Valves" at this level.Documentation at /docs/config/service.html -->


-<Service name="Catalina">

<!--The connectors can use a shared executor, you can define one or more named thread pools-->


<!--<Executor name="tomcatThreadPool" namePrefix="catalina-exec-"maxThreads="150" minSpareThreads="4"/> -->


<!-- A "Connector" represents an endpoint by which requests are receivedand responses are returned. Documentation at :Java HTTP Connector: /docs/config/http.htmlJava AJP Connector: /docs/config/ajp.htmlAPR (HTTP/AJP) Connector: /docs/apr.htmlDefine a non-SSL/TLS HTTP/1.1 Connector on port 1111 -->


<Connector port="8080" redirectPort="8443" connectionTimeout="20000" protocol="HTTP/1.1"/>

<!-- A "Connector" using the shared thread pool-->


<!--<Connector executor="tomcatThreadPool"port="1111" protocol="HTTP/1.1"connectionTimeout="20000"redirectPort="8443" /> -->


<!-- Define a SSL/TLS HTTP/1.1 Connector on port 8443This connector uses the NIO implementation. The defaultSSLImplementation will depend on the presence of the APR/nativelibrary and the useOpenSSL attribute of theAprLifecycleListener.Either JSSE or OpenSSL style configuration may be used regardless ofthe SSLImplementation selected. JSSE style configuration is used below. -->


<!--<Connector port="8443" protocol="org.apache.coyote.http11.Http11NioProtocol"maxThreads="150" SSLEnabled="true"><SSLHostConfig><Certificate certificateKeystoreFile="conf/localhost-rsa.jks"type="RSA" /></SSLHostConfig></Connector> -->


<!-- Define a SSL/TLS HTTP/1.1 Connector on port 8443 with HTTP/2This connector uses the APR/native implementation which always usesOpenSSL for TLS.Either JSSE or OpenSSL style configuration may be used. OpenSSL styleconfiguration is used below. -->


<!--<Connector port="8443" protocol="org.apache.coyote.http11.Http11AprProtocol"maxThreads="150" SSLEnabled="true" ><UpgradeProtocol className="org.apache.coyote.http2.Http2Protocol" /><SSLHostConfig><Certificate certificateKeyFile="conf/localhost-rsa-key.pem"certificateFile="conf/localhost-rsa-cert.pem"certificateChainFile="conf/localhost-rsa-chain.pem"type="RSA" /></SSLHostConfig></Connector> -->


<!-- Define an AJP 1.3 Connector on port 8009 -->


<Connector port="8009" redirectPort="8443" protocol="AJP/1.3"/>

<!-- An Engine represents the entry point (within Catalina) that processesevery request. The Engine implementation for Tomcat stand aloneanalyzes the HTTP headers included with the request, and passes themon to the appropriate Host (virtual host).Documentation at /docs/config/engine.html -->


<!-- You should set jvmRoute to support load-balancing via AJP ie :<Engine name="Catalina" defaultHost="localhost" jvmRoute="jvm1"> -->


-<Engine name="Catalina" defaultHost="localhost">

<!--For clustering, please take a look at documentation at:/docs/cluster-howto.html (simple how to)/docs/config/cluster.html (reference documentation) -->


<!--<Cluster className="org.apache.catalina.ha.tcp.SimpleTcpCluster"/> -->


<!-- Use the LockOutRealm to prevent attempts to guess user passwordsvia a brute-force attack -->


-<Realm className="org.apache.catalina.realm.LockOutRealm">

<!-- This Realm uses the UserDatabase configured in the global JNDIresources under the key "UserDatabase". Any editsthat are performed against this UserDatabase are immediatelyavailable for use by the Realm. -->


<Realm className="org.apache.catalina.realm.UserDatabaseRealm" resourceName="UserDatabase"/>

</Realm>


-<Host name="localhost" autoDeploy="true" unpackWARs="true" appBase="webapps">

<Context reloadable="true" docBase="${catalina.home}/webapps/keti_main" path="/"/>

<!-- SingleSignOn valve, share authentication between web applicationsDocumentation at: /docs/config/valve.html -->


<!--<Valve className="org.apache.catalina.authenticator.SingleSignOn" /> -->


<!-- Access log processes all example.Documentation at: /docs/config/valve.htmlNote: The pattern used is equivalent to using pattern="common" -->


<Valve className="org.apache.catalina.valves.AccessLogValve" pattern="%h %l %u %t "%r" %s %b" suffix=".txt" prefix="localhost_access_log" directory="logs"/>

</Host>

</Engine>

</Service>

</Server>

이미지 만들기

sudo docker build -t 이미지이름:버전

예시
sudo docker build -t test:0.1

이미지 확인

빌드가 완료되면 이미지가 생성되고 다음과 같이 확인할 수 있다.

sudo docker images

2. 이미지 실행

1번을 통해 만든 이미지를 다음과 같이 실행한다

sudo docker run 이미지명:버전

sudo docker run -p 80:1111 이미지명:버전

아래와 같은 -p는 80포트로 오는 요청을 1111포트로 전달해주겠다는 의미이다.

다음과 같이 실행하였다면 war파일이 제대로 배포되어있는것을 확인할 수 있다.


3. 도커 코드

실행중인 컨테이너 상태 보기

sudo docker ps


실행중인 컨테이너 IP보기

sudo docker inspect -f "{{ .NetworkSettings.IPAddress }}" Container ID
반응형
반응형

https://swexpertacademy.com/main/main.do


SW Expert Academy

SW 프로그래밍 역량 강화에 도움이 되는 다양한 학습 컨텐츠를 확인하세요!

swexpertacademy.com

1. 해결방법

문제의 상하좌우라는 키워드를 보자마자 완전탐색이 가장 어울릴것이라는 생각이 들었다. DFS를 통해 순차적으로 탐색하면서 카운트 해주는 방법으로 해결하였다


2. 코드

#include<iostream>
using namespace std;

int test_case;
int T;
int N;
int ary[1000][1000];
bool ary_check[1000][1000];
int dx[4] = {-1, 1, 0, 0};
int dy[4] = {0, 0, -1, 1};
int cnt_max = 1;
int val_min = 9999;
void check(int x, int y, int cnt, int start_value){
	ary_check[x][y] = true;
    
    for(int i = 0; i < 4; i++){
  		int nx = x + dx[i];
        int ny = y + dy[i];
        
        if(nx < 0 || ny < 0 || nx >= N || ny >= N || abs(ary[nx][ny] - ary[x][y]) != 1 || ary_check[nx][ny]){
         
            
            continue;   
        }
        check(nx, ny, cnt+1, start_value);
      	ary_check[nx][ny] = false;
    }
   
    if(cnt_max < cnt){
             	cnt_max = cnt;
        val_min = start_value;
    }else if(cnt_max == cnt){
     	if(val_min > start_value)
            val_min = start_value;
    }
}

int main(int argc, char** argv)
{
	cin>>T;
	
	for(test_case = 1; test_case <= T; ++test_case)
	{
		cin >> N;
                        memset(ary, 0, sizeof(ary));
		for(int i = 0; i < N; i++){
            for(int j = 0; j < N; j++){
                cin >> ary[i][j];
            }
        }
        
                        cnt_max = 1;
				val_min = 9999;
        for(int k = 0; k < N; k++){
            for(int n = 0; n < N; n++){

                check(k, n, 1, ary[k][n]);
                ary_check[k][n] = false;
            }
        }
        
		cout << "#" << test_case << " " << val_min << " " << cnt_max << endl;
	}
	return 0;//정상종료시 반드시 0을 리턴해야합니다.
}


반응형
반응형

https://swexpertacademy.com/main/main.do


SW Expert Academy

SW 프로그래밍 역량 강화에 도움이 되는 다양한 학습 컨텐츠를 확인하세요!

swexpertacademy.com

1. 해결방법

1-1 오류발생

먼저 한 사람씩 비교하여 방문지로 체크했다가 다음 사람은 전에 방문했던적이 있는지 없는지 비교하여 cnt를 ++ 해주는 방법을 사용하였으나 첫방문자가 1~400까지 방문했을경우 나머지는 모두 ++ 되어버리는 오류가 존재하였다


1-2 오류코드

#include<iostream>
#include<string.h>
#include<algorithm>
using namespace std;

int N;
int now_room;
int next_room;
int cnt = 0;
int room[401] = {0};
int now_check;
int next_check;

int main(int argc, char** argv)
{
    int test_case;
    int T;
    cin>>T;
    for(test_case = 1; test_case <= T; ++test_case)
    {
        memset(room, 0 , sizeof(room));
        cnt = 1;
        cin>>N;
        for(int i = 0; i < N; i++){
            cin >> now_room;
            cin >> next_room;
            if(now_room > next_room){
                swap(now_room, next_room);
            }
            
            for(int k = now_room; k<=next_room; k++){
                if(room[k]){
                     cnt++;
                    break;
                }
            }
            
                for(int j = now_room; j <= next_room; j++){
                    room[j] = 1;
                }
            
        }
        cout << "#" << test_case << " " << cnt << endl;
    }
    return 0;//정상종료시 반드시 0을 리턴해야합니다.
}

2. 해결

1번 방법과 비슷한대신 방문지를 ++해주고 마지막에 방문지중 가장 큰 값을 return한다 이방법으로 1번의 오류를 해결하였다


코드

#include<iostream>
#include<string.h>
#include<algorithm>
using namespace std;

int N;
int now_room;
int next_room;
int room[401] = {0};
int now_check;
int next_check;
int cnt = 0;
int main(int argc, char** argv)
{
	int test_case;
	int T;
	cin>>T;
	for(test_case = 1; test_case <= T; ++test_case)
	{
		memset(room, 0 , sizeof(room));
        cin>>N;
        for(int i = 0; i < N; i++){
            cin >> now_room;
            cin >> next_room;
            if(now_room > next_room){
				swap(now_room, next_room);
            }

            if((now_room % 2) == 0) now_room--;
            if((next_room % 2) == 1) next_room++;
            
            for(int j = now_room; j <= next_room; j++){
             room[j]++;   
            }
        }
        cnt = *max_element(room, room+401);
        cout << "#" << test_case << " " << cnt << endl;
	}
	return 0;//정상종료시 반드시 0을 리턴해야합니다.
}
반응형
반응형

1. 비동기 처리란?

먼저 동기 처리란 하나의 요청이 처리되는 동안 다른 요청이 처리되지 못하며 요청이 완료되어야 다음 처리가 가능한 방식이다. 이와 반대로 비동기 처리란 하나의 요청이 처리되는 동안 다른 요청도 처리되는 방식으로 요청이 완료되지 않아도 다음 처리가 진행되는 것을 의미한다


비동기 예시

setTimeout(_ => {
    console.log('1')  // 2번
  }, 1000)
  console.log('2') // 1번

만약 다음과 같은 코드가 만약 동기 처리였다면 콘솔에는 1 > 2 순으로 결과가 나타났을 것이다. 하지만 비동기 처리방법에서는 2 > 1 순으로 결과가 나타나게 된다 이는 setTimeout함수가 끝나기 전에 console.log('2')가 먼저 실행되기 때문이다. 이를 해결하기 위해 callback을 사용하게 된다면 다음과 같은 방법으로 가독성이 떨어지게 될 것이다.

setTimeout(_ => {
  console.log(`1`)
  setTimeout(_ => {
    console.log(`2`)
    setTimeout(_ => {
      console.log(`3`)
    }, 1000)
  }, 1000)
}, 1000)

2. Promise란?

1번과 같이 비동기 처리에서 callback함수를 이용하는 것 대신 promise를 이용하여 비동기를 처리할 수 있다.

function example(callback) {
  return new Promise(function (resolve, reject) {
    setTimeout(_ => {
    	console.log('1번')
    resolve() // 인자를 넘겨줄 수도 있음 그러면 then함수에 인자를 넘겨줌
  }, 500)
  });
}

// example()의 실행이 끝나면 호출되는 then()
example().then(function () {
  // resolve()의 결과 값이 여기로 전달됨
  console.log('2번'); //
});

다음과 같이 example함수를 실행했을 경우에는 Promise객체가 생성되고 1초 뒤 콘솔 1번이 실행된 후 then의 있는 콘솔 2번이 출력되게 된다. 만약 여러 개의 함수를 처리할 경우 다음과 같다.


new Promise(function(resolve, reject){
  setTimeout(function() {
    resolve(100);
  }, 1000);
})
.then(function(result) {
  console.log(result); // 100
  return result + 100;
})
.then(function(result) {
  console.log(result); // 200
  return result + 100;
})
.then(function(result) {
  console.log(result); // 300
});

then 함수를 통해 다음과 같이 사용하게 되면 처음에는 100을, 이후에는 200, 최종 결과로는 300을 출력하게 된다.


3. async & await란?

async & await 문법은 비동기로 실행되는 것들을 끝날 때까지 기다린다는 의미로 callback처럼 동기 방식으로 처리가 가능하게 해주는 문법이다. 중요한 점으로는 Promise로 처리가 되는 것만 await가능하다.


function example() {
  return new Promise(function(resolve, reject) {
    setTimeout(_ => {
    console.log('1번')
    resolve()
  }, 500)
  });
}

async function log() {
  await example();
  console.log('2번');
}

다음과 같이 log라는 함수가 실행되게 되면 example() 함수가 실행된다 example함수는 promise함수로서 1번이라는 값을 출력하고 await구문에 의해 이 promise과정이 끝난 후 console.log('2번')이 실행된다.


function getData(query) {
  return new Promise(function (resolve, reject) {
    $.get('/query', function (response) {
      resolve(response);
    });
  });
}

async function main() {
  var res1 = await getData(sql1);
  var res2 = await getData(sql2);
  console.log(res1);
  console.log(res2);
}

다음과 같이 서버와 통신을 하는 예제도 생각해볼 수 있다. 메인 함수에서 getData(sql1)이 실행되고 Promise함수에서 이를 처리할 때까지 getData(sql2)는 실행되지 않는다 이후 처리가 완료되면 getData(sql2)가 실행되고 console에 res1, res2가 찍히는 것을 확인할 수 있다.

반응형
반응형

https://programmers.co.kr/learn/challenges?tab=all_challenges


프로그래밍 강의 | 프로그래머스

기초부터 차근차근, 직접 코드를 작성해 보세요.

programmers.co.kr

1. 해결방법

stack을 활용하여 올바른 괄호 문자열인지 확인하고, 나머지는 문제에서 제시한 방법대로 재귀함수를 진행한다


2. 코드

#include <string>
#include <string.h>
#include <vector>
#include <stack>
#include <iostream>
using namespace std;
    string answer = "";

bool check(string p){
    stack<char> st;
    for(int i = 0; i < p.length(); i++){
        if(!st.empty() && p[i] == ')'){
            if(st.top() == '(') {
                st.pop();
            }else {st.push(p[i]);} 
        }else {st.push(p[i]);}
    }

    if(st.empty()) return 1;
    else return 0;
}

string check_function(string p){
    if(p == "") return "";
    string u = "";
    string v = "";
    int left = 0;
    int right = 0;
    
    if(check(p)) {return p;}
    else{
        for(int i = 0; i < p.length(); i++){
            if(p[i] == '(') left++;
            else right++;
            if(left == right) {
                u = p.substr(0,left+right);
                v = p.substr(left+right, p.length());
                
                if(check(u)){ 
                    return u + check_function(v);
                }else{
                    string temp;
                    temp += "(";
                    temp += check_function(v);
                    temp += ")";
                    string temp2 = u.substr(1, u.length()-2);
                    for(int j = 0; j < temp2.length(); j++){
                        if(temp2[j] == '(') temp += ")";
                        else temp += "(";
                    }
                    return temp;
                }
                
            }
            
        }
    }
}

string solution(string p) {
    if(p == "") return "";
    answer = check_function(p);
    return answer;
}
반응형
반응형


https://programmers.co.kr/learn/challenges?tab=all_challenges


프로그래밍 강의 | 프로그래머스

기초부터 차근차근, 직접 코드를 작성해 보세요.

programmers.co.kr

1. 해결방법

문제에서 제시한 개수만큼 글자를 자르고 이전과 다음으로 저장하여 비교하는 방식을 사용하였다.


2. 코드

#include <iostream>
#include <string>
#include <vector>

using namespace std;
int answer = 9999;
void check(int num, string s){
    int mok;
    if(s.length() % num == 0) mok = s.length() / num;
    else mok = s.length() / num + 1;
    string result = "";
    int check = 1;
    string pre; string next;
    for(int i = 0; i < mok-1; i++){
        pre = s.substr(i*num, num);
        next = s.substr((i+1) * num , num);
        
        if(pre == next) check++;
        else{
            if(check != 1) result += to_string(check) + pre;
            else result += pre;
            check = 1;
        }
    }
    if(check == 1) result += next;
    else result += to_string(check) + pre;
    if(result.length() < answer) answer = result.length();
    
}

int solution(string s) {
                answer = 9999;

    for(int i = 1; i <= s.length()-1; i++){
        check(i, s);
    }
    if(s.length() == 1) answer = 1;
        return answer;
}
반응형
반응형

https://swexpertacademy.com/main/main.do


SW Expert Academy

SW 프로그래밍 역량 강화에 도움이 되는 다양한 학습 컨텐츠를 확인하세요!

swexpertacademy.com

1. 해결방법

먼저 전에 가능한 시험 점수라는 문제를 풀면서 가능한 모든 점수를 구하는 문제를 푼 기억이 있어서 같은 방법으로 해결하면 좋겠다 라는 생각을 하였다. 가능한 시험 점수라는 방법으로 문제를 해결했으나, 깔끔한 코드가 아닌 것 같아서 다른 방법이 존재할까 찾아보았고 dfs로 가능하다는걸 알았다. 어렵지 않았는데 왜 dfs로 해결해볼까?라는 생각을 하지 못했다.


2. 코드

#include<iostream>
#include<string.h>
using namespace std;
	int test_case;
	int N;
	int top_height;
	int array[300000];
	int temp = 0;
	int sum = 0;
	int result = 0;
int main(int argc, char** argv)
{
    cin>>test_case;
	for(int i = 1; i <= test_case; i++)
	{
		cin >> N;
        cin >> top_height;
            memset(array, 0, sizeof(array));
        array[0] = 1;
       	for(int j = 0; j < N; j++){
            cin >> temp;
            sum += temp;
            for(int k = sum; k>=0; k--){
             if(array[k] != 0){
                 array[k + temp]++;
             }
            }
        
        }
        
         for(int m = 0; m< 300000; m++){
         if(array[m] !=0 && m >= top_height){
         	result = m - top_height;
                              break;
         }
        }

        
        cout << "#"<<i<<" "<< result << endl;
    }
	return 0;//정상종료시 반드시 0을 리턴해야합니다.
}
반응형

+ Recent posts